Let’s be real. There is a specific kind of panic that sets in when your favorite nail set starts to outstay its welcome. Maybe you’re at the three week mark, your regrowth is showing, and that one corner of your pointer finger is starting to lift just enough to snag on your hair. It’s tempting… dangerously tempting to just pop it off.
But as your nail tech. I’m here to tell you, put the nail down. I know life happens. Maybe my schedule is packed, or you’re stuck at home and just can’t make it to an appointment for a soak off. While I always prefer to see you in my chair so I can baby your natural nails myself, I’d much rather you do it correctly at home than to peel it off and pray that it doesn’t break your nail. Let’s walk through why your nails get damaged and how you can perform a salon grade removal in your own kitchen.
As informative that this blog is, I have a ton more you can read here —> https://nailsbyemely.com/blog/
Why Peeling is a Nail Crime
To understand why we soak, we have to understand what your nail is actually made of. Your natural nail isn’t just one solid, indestructible shield; it’s actually made of about 100 thin layers of keratinized cells pressed together. The very top layer is called the dorsal layer. This is the strongest, most important part of your nail because it’s what the product, like acrylic grips onto for dear life.
When you peel, pop, or force off an enhancement, the bond between the product and your nail is stronger than the bond between your own nail layers. This means the product doesn’t just let go, it takes the top 10–20 layers of your natural nail WITH IT. This is exactly why your nails feel paper thin, bendy, and sore after you pick them off. It’s not the chemicals in the product that ruined your nails, it was the physical trauma of the removal.
The Save My Nails Toolkit
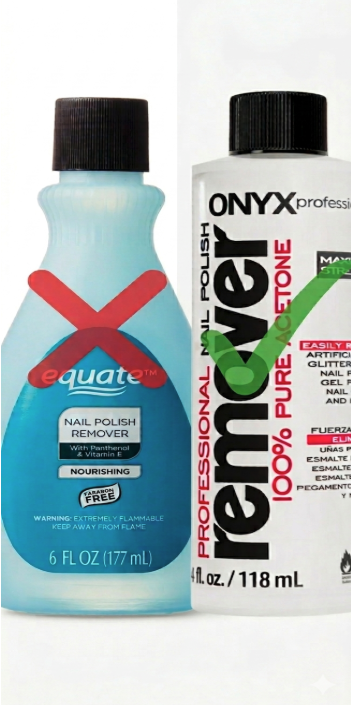
Before you even think about starting, check your cabinets. Using non acetone polish remover (the blue or purple kind from the grocery store) will not work for professional acrylic. You need the heavy hitters.
Grab these items:
- 100% Pure Acetone: This is the only thing that will break down the polymers in your extensions.
- A Nail File (100/180 grit or 100/80 grit): You need a coarse side to break through the product.
- Cotton Balls or Pads: I recommend cutting cotton pads into quarters so they fit your nails perfectly without wasting product.
- Aluminum Foil: Cut into 10 squares, about 3×3 inches each.
- A Wooden Orange Stick or Metal Cuticle Pusher: For the gentle nudge.
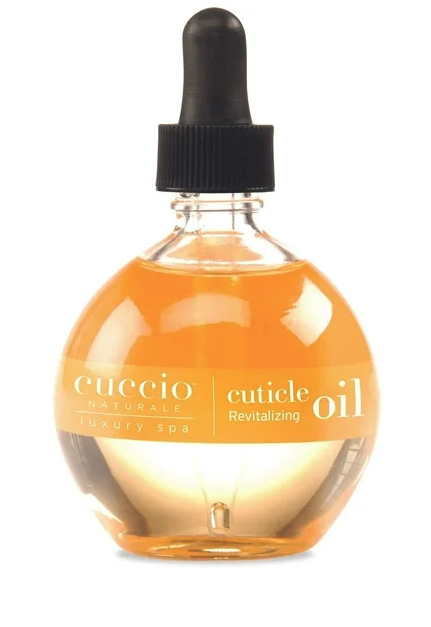
- Cuticle Oil: If you don’t have any, jojoba oil or even olive oil will do in a pinch, maybe even vaseline if you’re desperate.
Step 1: Buff the Surface
Most professional top coats are designed to be acetone resistant. That’s why your polish stays shiny for weeks! However, that shine is now your enemy. Take your 100 grit file and buff the surface of every single nail until the shine is completely gone.
If you have long acrylic extensions, use a clipper to cut down as close to your natural nail length as possible. The less surface area the acetone has to melt, the faster you get to go to bed.
- For Builder Gel: File the product down until it’s very thin, but stop before you hit your natural nail. Remember.. Builder gel DOES NOT soak off. You just need to file it all off with a coarse file.
- For Acrylics: Thin out all of the bulk.
Caution: Make sure you don’t file all the way down to your natural nail, just thin out the bulk of the product.
Step 2: The Skin Shield Trick
Acetone is a solvent, which means it’s literally designed to eat things. While it’s safe for a short time, it will turn your skin white and chalky by sucking out every drop of moisture.
To prevent this, apply a bit of cuticle oil to the skin around your nail and your knuckles. Just be careful not to get it on the nail itself, as the oil can actually act as a barrier and prevent the acetone from soaking into the product.
Step 3: The Soak and Wrap Technique
This is where most people go wrong. You can’t just dip your fingers in a bowl of acetone (well technically you can) but heat is our #1 friend with this step, which is why wrapping is important.
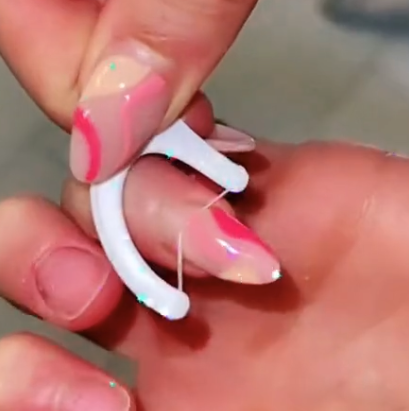
- FULLY soak your cotton piece with 100% acetone.
- Place it directly onto the filed nail.
- Wrap the foil square around your finger tightly. You want to create an airtight seal.
The Pro Tip: Fold one side across, then the next, and lastly fold the tip of the foil under your finger to trap the heat in.

Step 4: The 20 Minute Meditation
Now, let your hands sit. Set a timer for 20 minutes. Don’t try to peek, even at the 10 minute mark. Every time you open the foil to check, the acetone evaporates and the product starts to re-harden. If you find it hard to sit still, put on a show, YouTube video or a podcast and commit to not touching your hands until it’s over.
Step 5: Slide, Don’t Scrape Rule
After 20 minutes, take one foil off. The product should look like it’s blooming, bubbling up, or looking soft like wet cake.
Use your wooden orange stick or pusher to gently nudge the softened product off the nail. It should slide right off with zero effort. If you hit a spot that feels hard or stuck DO NOT PUSH. Re-wrap that finger for another 5–10 minutes. This is the stage where most people get impatient and start scraping, which leads to those white scuff marks on your natural nails. Patience is the difference between healthy nails and a repair bill later.
Why You Should Avoid the TikTok Hacks
I’ve seen viral removal methods that honestly make me want to close my eyes.
Let’s debunk a few:
- The Dental Floss Hack: People use a floss pick to saw under the nail to pop it off. This is essentially controlled peeling. It rips the nail layers apart and can cause onycholysis (where your nail lifts away from the pink nail bed).
- The Hot Acetone Microwave Method: Never, ever put acetone in the microwave. It’s highly flammable. If you want it warm, put the acetone bottle in a bowl of warm water like a baby bottle.
- Warm Water and Dish Soap: This might work for press ons, but it will do absolutely nothing for professional acrylics or builder gel. You’ll just end up with prune fingers and an intact set of nails.
Aftercare
Once the product is gone, your natural nails are going to look a little sad and dehydrated. This is normal! Acetone removes the natural oils from your nail plate.
- Wash your hands with mild soap to stop the chemical reaction.
- Apply cuticle oil every hour for the first few hours. Your nails are porous, and they will soak that oil right up.
- Use a very fine grit buffer (220 grit or higher) to gently smooth any tiny ridges.
- If your nails feel extra sensitive, wait 24–48 hours before applying any new polish to let the keratin layers settle and re-hydrate.
Trust the Process
I know it’s a lot of work for a diy project, but your nails are the foundation for everything we do. If you take care of them during the off time, your next set is going to look ten times better and stay on ten times longer.
If you wanna learn other ways to make them last check out this other blog! If you’re a tech and need help with retention don’t worry I have one for you too 😉 –> Retention Tips
Healthy nails make my job easier and your sets look more flawless!
Until I see you back in my chair, stay hydrated, keep your cuticles oiled, and please, for the love of all things glittery. STOP PICKING!
Don’t wanna do it yourself? Find time to book an appointment with @nailsby_.emely !!